Your Cart is Empty


Water leaks can cause significant damage to a property and can be difficult to detect, especially when they are hidden behind walls or ceilings. Traditional methods of detecting water leaks, such as visual inspections and moisture meters, can be time-consuming and may not always be accurate. However, with the advancement of technology, thermal cameras have become a popular tool for detecting water leaks.
Thermal cameras use infrared technology to detect differences in temperature, allowing them to identify areas where water may be present. This technology is particularly useful for detecting hidden water leaks that may not be visible to the naked eye. By using a thermal camera, homeowners and professionals can quickly and accurately locate water leaks, saving time and money on repairs.
Table Of Contents

Key Takeaways
Thermal cameras work on the principle of detecting infrared radiation emitted by objects. Every object with a temperature above absolute zero emits infrared radiation. The camera detects this radiation and converts it into an image that shows the temperature distribution of the object. The hotter the object, the more radiation it emits, and the brighter it appears in the image.
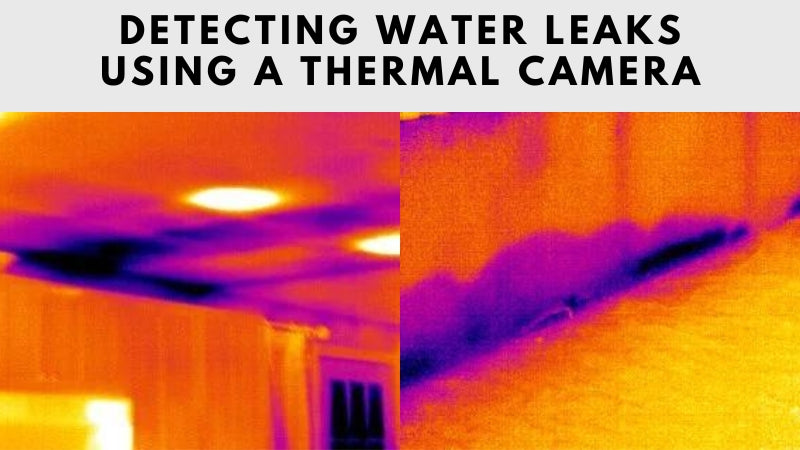
Thermal imaging is useful for detecting water leaks because water has a different temperature than the surrounding materials. A thermal camera can detect the temperature difference and produce an image that shows the location of the leak.
When choosing a thermal camera for detecting water leaks, it is important to consider the camera's resolution, sensitivity, and field of view (FOV). A higher resolution camera can detect smaller temperature differences and provide more detailed images. A more sensitive camera can detect smaller temperature differences, which is useful for detecting small leaks. A wider field of view allows the camera to cover a larger area, which is useful for inspecting large buildings.
In summary, thermal cameras are an effective tool for detecting water leaks. By understanding the principles of thermal imaging and the types of thermal cameras available, one can choose the best thermal camera for the job.
When it comes to detecting water leaks using a thermal camera, preparation is key. Before you start, you need to ensure that you have the right equipment and have set it up correctly. In this section, we will discuss the steps you need to take to prepare for detecting water leaks with a thermal camera.

The first step in preparing to detect water leaks with a thermal camera is to ensure that you have the right camera for the job. There are many thermal cameras available on the market, but not all of them are suitable for detecting water leaks. Look for a thermal camera that has a high thermal sensitivity, as this will allow you to detect even the smallest temperature differences.
If you are using a thermal camera on your phone, make sure that it is compatible with your device. There are many thermal cameras available for both Android and iPhone devices, but not all of them work with every phone model. Check the specifications of the camera to ensure that it is compatible with your phone.
Here’s a list of a few thermal cameras we recommend for detection of moisture leaks.
Once you have chosen the right thermal camera, the next step is to set it up correctly. Make sure that the camera is fully charged and that you have the necessary accessories, such as a memory card, lens accessories.
When setting up your thermal camera, it is important to ensure that it is calibrated correctly. This will ensure that the camera is accurately measuring temperature differences. Follow the manufacturer's instructions to calibrate your camera.
Before you start detecting water leaks, it is also important to familiarize yourself with the camera's settings and features. Take some time to experiment with the camera and adjust the settings to suit your needs. Advanced Tools can assist with this one. We can even offer training packages to get you started.
By choosing the right thermal camera and setting it up correctly, you will be well-prepared to detect water leaks with ease.
When it comes to detecting water leaks using a thermal camera, there are two main steps involved: identifying the area and interpreting thermal camera images.
The first step in detecting a water leak is to identify the area that needs to be inspected. This can be done by looking for signs of water damage, such as water stains on walls or ceilings, dampness or moisture in carpets or flooring, or a musty smell.
Once the area has been identified, it's important to ensure that it is dry before using a thermal camera. Any moisture on the surface can interfere with the accuracy of the thermal camera readings.
Thermal cameras work by detecting differences in temperature, which can be used to identify areas where water is present. When using a thermal camera to detect a water leak, it's important to understand how to interpret the images.
Areas that are wet will typically appear cooler than surrounding dry areas on a thermal camera image. This is because water has a higher thermal conductivity than air, which means it conducts heat away from the surface more efficiently. As a result, areas that are wet will appear as cooler spots on a thermal camera image.
It's important to note that thermal camera images can be affected by a range of factors, including the temperature of the surface being inspected, the ambient temperature, and the distance between the camera and the surface. As such, it's important to take multiple readings from different angles to ensure that the results are accurate.
In summary, detecting a water leak using a thermal camera involves identifying the area to be inspected and interpreting thermal camera images to identify areas where water is present. By following these steps, it's possible to quickly and accurately detect water leaks and prevent further damage.

One common issue when using a thermal camera to detect water leaks is the occurrence of false positives. False positives can be caused by various factors, such as reflections, hot spots, or even the presence of other sources of moisture. To avoid false positives, it is important to take the following steps:
Another issue that can arise when using a thermal camera to detect water leaks is inaccurate readings. Inaccurate readings can be caused by various factors, such as improper calibration, incorrect settings, or operator error. To ensure accurate readings, it is important to take the following steps.
To ensure accurate readings, it is important to calibrate your thermal camera regularly. The frequency of calibration depends on the manufacturer's recommendations and the frequency of use. It is recommended to calibrate the camera at least once a year.
During calibration, the camera is exposed to a known temperature source, and adjustments are made to ensure accurate temperature readings. If the camera is dropped or exposed to extreme temperatures, it may need to be recalibrated.
Thermal cameras are delicate instruments that require proper care and handling. To protect your equipment, it is important to store it in a protective case when not in use.
When using the camera, avoid exposing it to extreme temperatures or moisture. If the camera gets wet, dry it thoroughly before using it again. Avoid touching the lens or sensor with your fingers, as oils from your skin can damage the equipment.
Regular cleaning of the lens is also important. Use a soft, dry cloth to wipe away any dust or debris. Avoid using harsh chemicals or abrasive materials that can scratch the lens.
By following these maintenance and care tips, you can ensure that your thermal camera remains in good condition and provides accurate readings for years to come.
What are the most effective thermal imaging cameras for identifying water leaks?
There are many thermal imaging cameras available in the market that can effectively detect water leaks. However, the most effective ones are those that have high thermal sensitivity, high resolution,
and high accuracy. Some examples of highly effective thermal imaging cameras for detecting water leaks include.
How can you locate air leaks using a thermal imaging device?
Air leaks can be detected using a thermal imaging device by looking for temperature differences in the surrounding air. When air leaks occur, they cause temperature changes in the surrounding air, which can be detected by a thermal imaging device. The device can then pinpoint the location of the air leak, allowing for quick and easy repairs.
Is it possible for thermal cameras to detect leaks through water?
Yes, thermal cameras can detect leaks through water. This is because thermal imaging technology can detect temperature differences in the water caused by the water leak. The thermal camera can then pinpoint the location of the leak, making it easier to repair.
How does thermal imaging technology assist in pinpointing water leakages?
Thermal imaging technology assists in pinpointing water leakages by detecting temperature differences in the surrounding area. When a water leak occurs, it causes a temperature change in the surrounding area, which can be detected by a thermal imaging device. The device can then pinpoint the location of the leak, making it easier to repair.